The PluginConfiguration API allows you to configure various pluggable plugins for a Fabric-enabled LogPoint from the Director Console API.
The configuration parameters required to configure each plugin is different. Refer to the Director Console API Documentation of the specific plugin to obtain more information on the plugins and the parameters required for the configuration of the plugin.
The following diagram depicts a general workflow for configuring a pluggable plugin from the Director Console API.
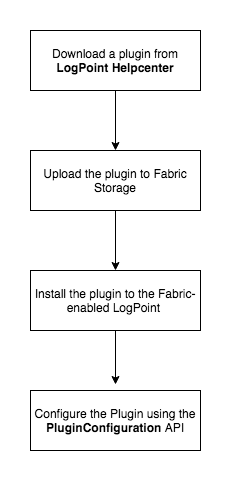
Configuring a Pluggable Plugin from the Director Console API
Follow the steps below to configure a pluggable plugin from the Director Console API.
Download the required plugin from the LogPoint Help Center.
Option A: Upload the plugin application file and make it accessible to all users across all Pools:
Execute the Upload - UploadPublic API with the required parameters.
Option B: Upload the plugin application file and make it accessible to the users within a specific Pool:
Execute the Upload - Upload API with the required parameters.
List the plugins.
Option A: List the plugins uploaded in the private storage:
Execute the Upload - List API to obtain the value of the name parameter. Use this value in the file_name parameter of the Upload - Install API.
Option B: List the plugins uploaded in the public storage:
Execute the Upload - ListPublic API to obtain the value of the name parameter. Use this value in the file_name parameter of the Upload - Install API.
Execute the Upload - Install API to install the plugin in a Fabric-enabled LogPoint.
Execute the PluginConfiguration - ListPlugins API to obtain the value of the name parameter. Use this value in the plugin_name parameter of the PluginConfiguration - Create API URL.
Execute the PluginConfiguration - Create API with the required parameters to configure the plugin installed in the Fabric-enabled LogPoint.
Note
Refer to the Director Console API guide of the specific plugin to identify the parameters required for the configuration of the plugin.
In the following example, the Threat Intelligence Plugin is being uploaded and installed along with configuration of the mapping of the Threat Intelligence Plugin.
Note
Download the required plugin application file from the LogPoint Help Center.
Execute the Upload - Upload API in the Director Console API to upload the plugin application file to the Fabric Storage.
Config API:

POST
https:://api-server-host-name/configapi/v1/Uploads/{pool_UUID}/
Response:

{
"status": "Success",
"message": "threatintel_3.4.0.pak successfully uploaded in private storage."
}
Note
Mention the file_name and Content-Type in the header of the request.
Browse the plugin application package from your local storage to the API.
This step successfully uploads the plugin application file to the Fabric Storage.
Execute the Upload - List API to list the name of the application package files uploaded in the private storage.
Config API:

GET
https:://api-server-host-name/configapi/v1/Uploads/{{pool_UUID}}/list

Response:

[
"threatintel_3.4.0.pak"
]
Execute Upload - Install API to install the plugin in the Fabric-enabled LogPoint. Use the value of the name parameter obtained from Step 1 in the file_name parameter of the Upload - Install API.
Config API:

POST
https:://api-server-host-name/configapi/v1/Uploads/{pool_UUID}/{logpoint_identifier}/install

{
  "data": {
    "file_location": "private",
    "application_type": "Application",
    "file_name": "threatintel_3.4.0.pak"
        }
}

Response:

{
"status": "Success",
"message": "monitorapi/v1/208118f9ee8049d3a23c2da7ed7f1a3a/3324b10a5bbb4a51891860b50cf7b6b9/orders/70dc7ed9-4a10-464e-86b6-ca4c8079ad6f"
}
Monitoring API:

GET
https:://api-server-host-name/monitorapi/v1/208118f9ee8049d3a23c2da7ed7f1a3a/3324b10a5bbb4a51891860b50cf7b6b9/orders/70dc7ed9-4a10-464e-86b6-ca4c8079ad6f"

Response:

{
    "request": {},
    "logpoint_identifier": "3324b10a5bbb4a51891860b50cf7b6b9",
    "pool_uuid": "208118f9ee8049d3a23c2da7ed7f1a3a",
    "response": {
    "message": "Application was successfully installed",
    "success": true
                }
}
This step successfully installs the plugin application file in the Fabric-enabled LogPoint.
Execute the PluginConfiguration - ListPlugins API to obtain the value of the name parameter.
Config API:

GET
https:://api-server-host-name/configapi/v1/{{pool_UUID}}/{{logpoint_identifier}}/PluginConfiguration

Response:

[
    {
"id": "5c2f2ce04503642a7fbdc02e",
"type": "processcommands",
"version": "3.4.0",
"name": "ti"
},
{
"id": "5c2f2ce34503642a7fbdc02f",
"type": "autonomous",
"version": "3.4.0",
"name": "TIPackage"
},
{
    "name": "ThreatIntelligence",
    "zk_nodes": [
        "Plugins",
        "CompiledNormalizers",
        "Ti_alias",
        "Ti_csis",
        "Ti_emergingthreat",
        "Ti_criticalstacksettings",
        "Ti_criticalstack",
        "Ti_customcsv",
        "Ti_blueliv",
        "Ti_circlmisp",
        "Ti_general",
        "Ti_mapping",
        "EnrichmentSource"
    ],
    "version": "3.4.0",
    "type": "enrichmentsource",
    "id": "5c2f2cdf4503642a7fbdc02d"
}
]
Execute the PluginConfiguration - Create API with the required parameters to configure the plugin. Use the value of the name parameter obtained from Step 1 in the plugin_name parameter of the API URL.
Config API:

POST
https:://api-server-host-name/configapi/v1/{pool_UUID}/{logpoint_identifier}/PluginConfiguration/ThreatIntelligence

{
"data": {
        "key": "dell04",
        "column": "ip_address",
        "action":"ti_mapping"
}
}

Response:

{
"status": "Success",
"message": "monitorapi/v1/31db350edd1843c89aa136a218c2766d/3324b10a5bbb4a51891860b50cf7b6b9/orders/b3bbc504-2c95-4f48-bd0b-4ba552e21b4b"
}
Monitoring API:

GET

https:://api-server-host-name/monitorapi/v1/31db350edd1843c89aa136a218c2766d/3324b10a5bbb4a51891860b50cf7b6b9/orders/b3bbc504-2c95-4f48-bd0b-4ba552e21b4b

Response:

{
 "request": {
   "data": {
    "key": "dell04",
    "column": "ip_address",
    "action": "ti_mapping",
    "plugin": "ThreatIntelligence"
    },
    "request_type": "POST",
    "action": "plugins/configure"
    },
"logpoint_identifier": "3324b10a5bbb4a51891860b50cf7b6b9",
"pool_uuid": "31db350edd1843c89aa136a218c2766d",
"response": {}
}
This step successfully configures the mapping of the Threat Intelligence Plugin.